 On the end of the day I did a small job again. This time I did the inside of the front coamings, this is a relatively small job but you have to do it with a mirror and a flashlight laminating in a small area around the corner and this makes it not easy. I finally taped two pieces on the outside what was easy.
Monday, October 26, 2015
Taped the inside of the front coamings
On the end of the day I did a small job again. This time I did the inside of the front coamings, this is a relatively small job but you have to do it with a mirror and a flashlight laminating in a small area around the corner and this makes it not easy. I finally taped two pieces on the outside what was easy.
Sunday, October 25, 2015
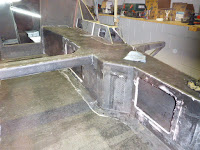
Glued the front coaming tops in place
I started this morning to unpack yesterday's work under supervision of my dad who gave me a visit to inspect the progress. When my dad did leave I dremeled all the sharp edge away inside the coaming because I could easily access them before the tops are in place. I then glued them in place. In the afternoon I did some small jobs on the fridge again as making an access pipe for the cool pipes, a bottom of corecell because this has more density and is smoother and a top panel were the cool element is coaming under. This panel will be glued in as the inside is laminated. On top of this panel comes the 5 cm blue Styrofoam again.


Saturday, October 24, 2015
laminated the mast support web
I started this morning with the fridge to glue another piece of foam in it. I than started with preparing for laminating the support web so as cutting carbon, peel ply, breather cloth, vacuum foil and putting tacky tape. In the afternoon we put the two layers biaxial carbon, four layers UD and two layers biaxial carbon again. In the begin we could not get enough vacuum bus after some work on the tacky tape the vacuum did get up and I could screw the vacuum back to -0,7 Bar. On the end I sanded the access holes for the bunks.


Friday, October 23, 2015
Thrill Seeker out of the water
 Today I did not build on the boat but we took Thrill Seeker out of the water and cleaned the bottom with high pressure water. Normally we cleaned it on the begin of the season but this is much easier.
Tomorrow we go building again.
Monday, October 19, 2015
glued the mast support web in place
I quit a little early from work to glue the mast support web in place with HD putty. After that I made the final Styrofoam panel for the fridge and glued some in place.


 |
| Update, I glued the other side panels also in place |
 |
| This is where the cool element will come |
Sunday, October 18, 2015
started with the fridge
This morning the work of yesterday was still a bit sticky so I decided to make the mast support web. This is made of four layers 10 mm HD foam glued together with PU glue. I than started on the bottom of the fridge made from two 5 cm layers Styrofoam so I have bicker flat bottom. I glued them on the bottom and together also. In the afternoon I started with the position the organisers and drilling the holes. Carbon has one disadvantage that you can not see were the HD pieces are, gladly I had taken pictures of the HD pieces were I had positioned them. Next was drawing the position of the jib sheet tracks. I then switched to the sides of the fridge, still one side to go. I finally trimmed the mast support web.


Saturday, October 17, 2015
Taping inside bunks and coamings
In the morning Fetske started to Dremel access hole edges while I was cutting some carbon tape for the inside of the bunks. I also drilled out the screw holes so they can be filled with putty. In the afternoon we taped the inside of the bunks, they were now accessible true the access holes. The next job was to tape the inside front of the coamings. This was not easy because I had to do it on feeling because I could not look inside. We than started with filling the edges with putty. I finally measured out the place where the mast base must come and drilled the holes. I used the beam mount mold to determine the place.


Subscribe to:
Posts (Atom)