Sunday, November 29, 2015

taped the step up and the front panel of the bunk

I started with cutting some carbon to tape the step up to the front and the bunk panel. When that was done I filed the edges of the fridge what I grind away yesterday. In the afternoon I put a tape on the underside of the entrance to make it what stronger because Friday my sliding hatch dropped on it and broke the foam. No big damages but made it clear that there must be some more carbon on it. Later there comes another layer over it again. I winded some carbon on the traveler side stays so that the UD is covered with some biaxial. On the end I started with drawing the anchor hatch on the deck.

Saturday, November 28, 2015

cut access hole for fridge in top panel

I had no much time today and I had only the morning to do something. I started with yesterday's panel to cut the edges and to round them. The last thing I could do was to cut a hole in the top panel for the fridge and dremel the edges so I could put some putty in it later.

Friday, November 27, 2015

glued a panel to the end of the bunk

Today I did not have so much time because of some household things in between jobs. In the morning I made the sliding hatch nicer to fit and I cut a panel for the end of the bunk so that it can be closed of.
Late in the afternoon I cut some carbon to tape the under inside of the bunk and to to tape the end piece. Nico did also gave me a visit to get some vacuum foil and to look at the progress. After the thee Fetske and Nico did leave and tape the underside and glued the end piece on its place. Taping the end piece was difficult. The sides where ok but after a few attempts to tape upside of the panel I decided to give it later another try with smaller tapes.

Sunday, November 22, 2015

laminated the front of the coamings over to the sides

I started with grinding some openings in the back of the sliding hatch top so that the hatch can go out. I trimed also the top of entrance a little so that the vertical part of the hatch can pass over. The glas of the fridge entrance had to be trimmed also. In the afternoon I grinded the vertical part of the sliding hatch so it can be filled with putty while Fetske did cut the carbon pieces and peel ply. The first thing what we did was filling the edges and and put some putty on the fridge edge so that that can be sanded later. The next job was putting some putty on the underside edges of the top of the sliding hatch. We than laid a tape on the inside over the putty and the turned it over to put it on the deck where we put some tape. The last job was to laminated the coamings over, we also put some UD on the place where some lifting eyes will come.


Saturday, November 21, 2015

cut an access hole in the top of the fridge

I started with gluing in some foam in the entrance of the fridge. When the glue was dry I cut the edge flat with the top and cut the access hole in the top. In between I made a vertical panel for under the sliding hatch. In the afternoon we did various tape work like the side of the entrance of the fridge, the bottom of one bunk, the underside of the outside bunk and the vertical panel under the sliding hatch.


Friday, November 20, 2015

Trimmed the top of the sliding hatch to fit on the deck

I started the morning with cutting the sides of the top of the sliding hatch so that er was enough room so the hatch could slide nicely under the top. I partly cut the entrance bigger and trimmed the front of the sliding hatch. Before lunch I cut the top of the fridge flat. In the afternoon I did grind the edges of the sliding hatch and the top so that they could be filled with putty. After the filling I started with the top of the fridge and cut some foam and glued it in place.

Sunday, November 15, 2015

laminated the top of the sliding hatch

This morning I started to cut the final foam parts while Fetske did all the cutting of the laminating stuff. On the end we waxed the mold. After the lunch we laminated the top off the sliding hatch and we had a nice vacuum. We had to return early to home because our parents were coming to visit us.

Update

Saturday, November 14, 2015

started with the top of the sliding hatch

I first had to work in the morning but everything went very well so I was back before twelve. Before lunch I prepared the fridge to put some putty in and made the top fit so it can be glued in. And finally I trimmed the excess carbon from the sliding rails. In the afternoon I put some putty in the fridge to get a smooth surface and glued the same time the top in place. Later I will cut a hole in again. After that was done I started to prepare the mold for the sliding hatch top and cut already some foam for it, tomorrow I only need to cut some smaller parts before we can start with laminating again.


Friday, November 13, 2015

glued some fittings in the hull

I first started with drilling another hole, this time for a fitting to get some free flow for the fridge cooling element. Normally this cooling pipe is under the sink but that is not possible with me so I make it to the outside. The next thing to do was making a panel on the top left of the entrance. In the afternoon We glue the fittings in place and taped the entrance to the sliding rails. We give the fridge box another layer of glass because I did find it a little to weak. The panel were the compressor comes on is also tape to the side.


Sunday, November 8, 2015

taped the sliding rails on the deck

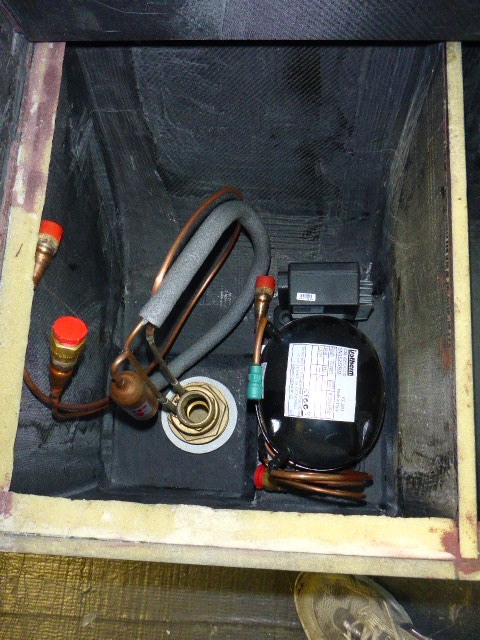
I started today with making a small panel to put the compressor on instead of the steal one. I than glued the HD foam to the floor and the sliding rails to the deck. I than laminated the HD foam over with two layers carbon. As last job for the morning I taped the vertical panel where the other panel for the compressor will rest on to the floor. In the afternoon I started to make some foam panels for the holding tank no pictures yet and they still have to be laminated. I made a top foam panel for the fridge what I forgot to laminated so that have to wait for next time. As final job I taped the rails to the deck.

Saturday, November 7, 2015

cutting some thru hull holes

Today my friend Rob did come assist me to make some decisions where to put the thru hull fittings.
But first we unpacked the sliding hatch and removed it from the mold. It looked very nice. We than decided were the fitting of the water cooled fridge had to come and drilled the hole. Next one was the waste water fitting. This one is a flush thru hull fitting so we had to rebated it on the outside with the router. We made some extra HD foam on the place where the fittings will come. In the afternoon we started with the sliding rails. For this we had to cut the access entrance a little bigger. We than cut the rails to fit on the right height. Next we cut the hatch sides to right hight and trimmed the back. We now could cut the sliding rails a little shorter, because we could determine the length the hatch had to move to the front. On the end of the day it slides very nice. Tomorrow I laminated it on the deck.