Friday, March 31, 2017

made the mold for the rudder bracket

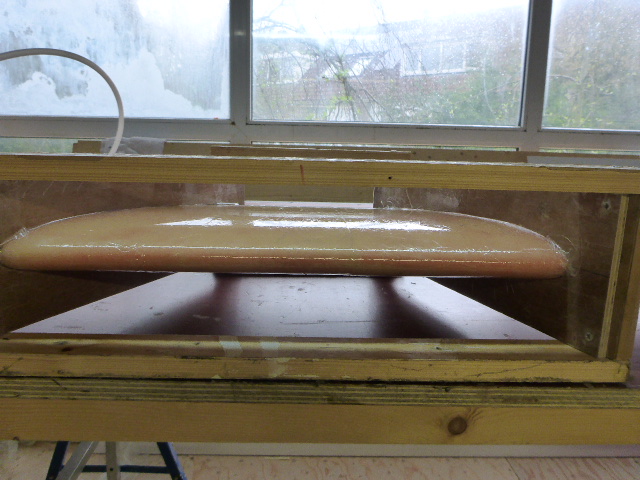
I started with taping the inside of the motor mount so I can trial fit it this weekend without breaking it. When that was done I focused on the mold for the rudder bracket. Nico did draw a nice pair of drawings for me how to cut the molds. I did glue them on the wood to cut the profile of the rudder out of it. After some sanding it fitted nicely with ample room to spare. I did put the wax plate over the rudder, I had to re cut some pieces because it was on the short side. I finally put a packing tape on it to get a smooth surface. The end plates were aligned with some old battens. The carbon for tomorrow is also cut so we can start with laminating. I finally mounted the last after clamp and then went home.


Tuesday, March 28, 2017

small steps on the outboard bracket

I took two hours free to do some small jobs. I first glued an end piece in the outboard bracket and put some fillets in the inside. Next step is to put a extra layer carbon or glass in the inside. I screwed the drain of the sink in place so now that is finished. The tube for the water were placed true the holes I did made earlier with PVC pipe. I placed some tube for hot water but it will not be used the first year, maybe later. I mounted one clamp on the back and I then diced it was time to quit.

Sunday, March 26, 2017

painted the rudder

This weekend I did not much time to post things because we had to go to our multi-hull club CTC, but works were still going on. We did prime the rudder and painted it two times. For now that is enough, it can now be used as a mold for the rudder bracket. I was a little worried about my motor mount how to set it up, but a small talk with Richard help a lot to get going on. Today I glued some panels together with some extra glass plates to the sides. It gives a bit more confidence now it gets it shape and I get more an idea how to make it.
Today I glued the kitchen sink in place and connected some hoses. The post for the flag is now in place, the base has to be painted before I can glue the post on it. I have now also drilled holes for the aft clamps, we use the 260 mm versions, they are a little big for in our waters but in Croatia you get rely thick mooring line so there it is handy to get some bigger clamps.


Sunday, March 19, 2017

started with the outboard mount

Rob did come today to help me with the outboard mount, I wanted something like Richard did on his F32SR. We first started with disabling the standard mounts because they are not necessary in this setup. We made some sides from wood so we could easy see how the setup must be. I only have the pictures of the setup so there is a little guesswork in it. We lifted the motor lots of times to make the right adjustments. On the end I glued some old panels together so that the sides will be strong enough. As last job we sanded the rudder and put some primer on it.

Saturday, March 18, 2017

put a filler on the rudder

I started directly with sanding the work I did yesterdays. After suspending the rudder on the roof I put a blue filler on it. The rest of the day I did a lot of small jobs. The organizers still have to be fixed but that goes better with a extra set of hands. I put a heater at the rudder so it is sand-able tomorrow


Friday, March 17, 2017

taped the front of the rudder

During the week I did some small things on the rudder like drilling holes and sanding the edges. In the morning I started directly with the rudder. I first made a vacuum back and then laminated the pieces what I did cut before. When finished I started with the block in the dagger board case to glue that in place but I first put a line threw the block to the top of the case. I had not enough bolts so I only put them on the corners, the rest will be later put in place. An other thing I did do last days was mounting the water tap in the toilet room. This was time consuming because of the narrow space.
Drilling the hole for the tap was a challenge, you can do it only right in one time because of the clear carbon. I also did some work on the hoses of the toilet, not much to see at the moment. In the afternoon I did some small time consuming things like drilling holes for the end stops of the traveler. I did also some work on the instrument panel locker but did not take photos. On the end of the day the laminated of the rudder was dry and I put some putty on the front so I can be sanded to morrow.

Sunday, March 12, 2017

Glued the rudder half's together

We routed the half's flat with the router tool and this worked very fine. Getting the half's out of the mold with a wedges was easy and it looked very good. You can see the in-print of tape we put in. This is for the carbon tape what comes over in in the front and the upper part. We glued the half's together with some carbosil and glass putty and put them under vacuum again. Before we glued them we put some screws in it so the half's stay on the exact position. In the afternoon Fetske laminated a plate of 5 layers 400 gr glass fiber. This will be used as backing plates and some other pieces to seal from the carbon. I painted the clear carbon pieces with clear coated epoxy. I hope the toiled is finished now so I can place it with some sikaflex on its place and finish this part.